
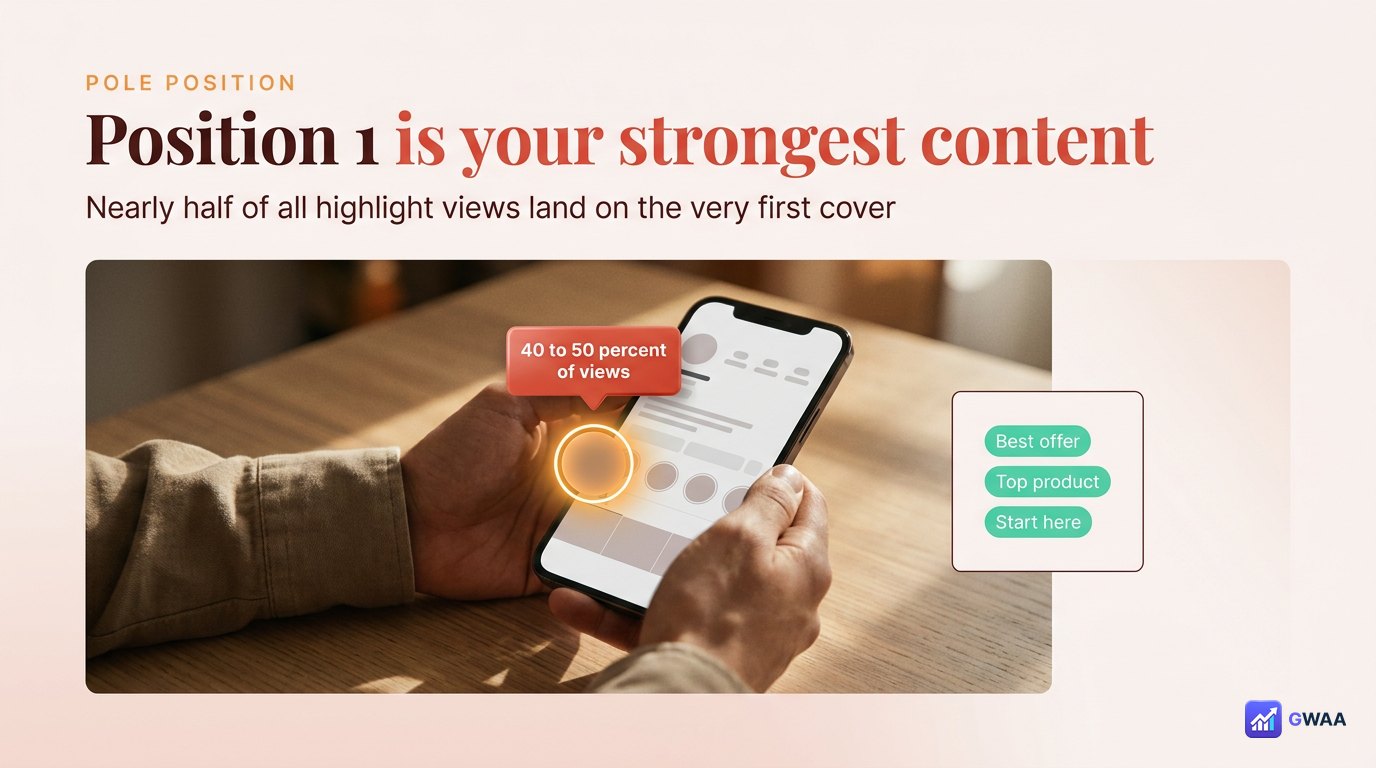
To reorder Instagram highlights: open your profile, tap any highlight to enter edit mode, then long-press an album and drag it left or right. The order updates instantly and persists. View counts carry over — nothing is lost. The first 4-6 positions get roughly 90% of all highlight views, so position your strongest content there.
⚡ Key takeaways
- Reorder by long-pressing an album in edit mode and dragging left or right.
- Position 1 gets ~40-50% of total highlight views — treat it as prime real estate.
- View counts and stories inside each album are preserved across reorders.
- Reorder strategically by content priority, not chronologically.
- Quarterly is the right rhythm — not too often, not too rare.
Why order matters more than you think
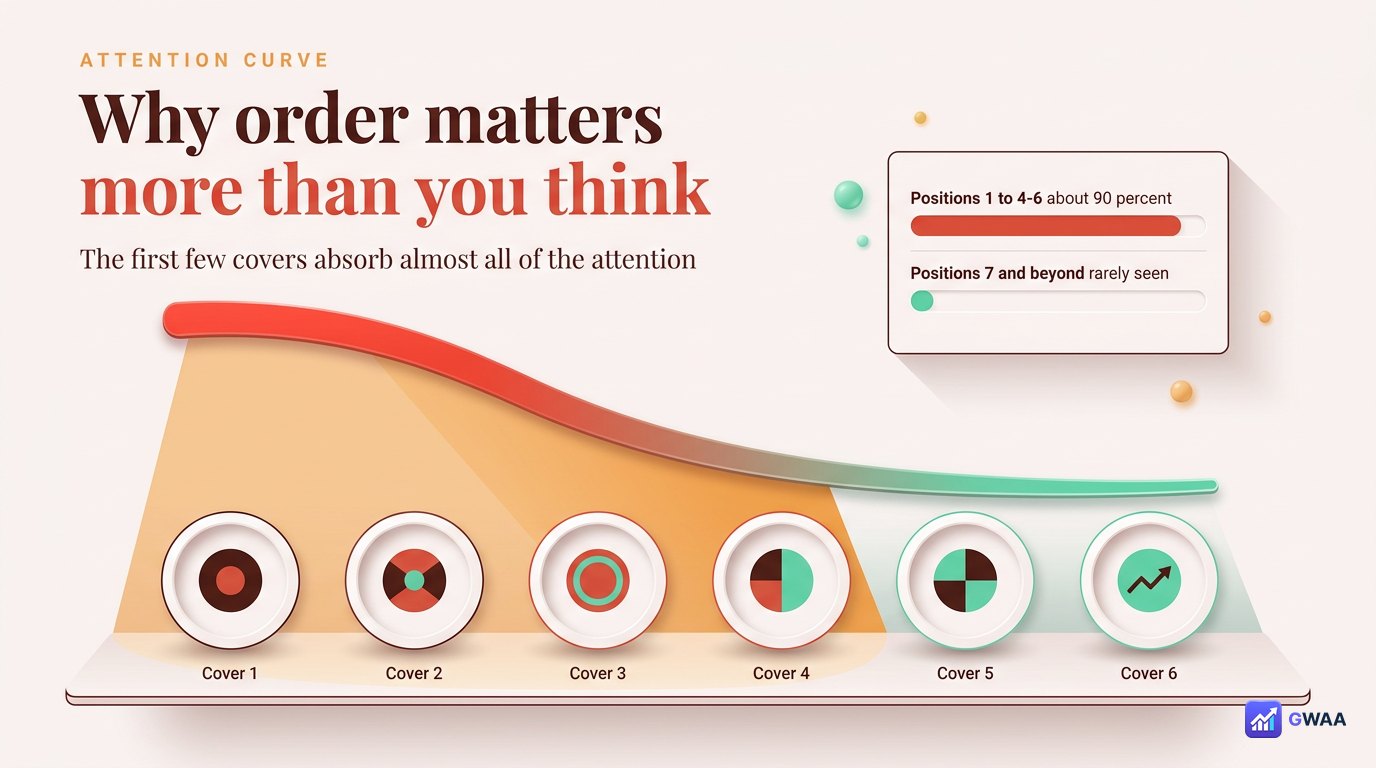
Highlight covers display in a horizontal scrolling row on your profile. Most visitors see only the first 4-6 covers without scrolling. Distribution of attention by position (from observation across multiple accounts):
- Position 1: ~40-50% of total highlight views
- Position 2: ~20%
- Position 3: ~15%
- Positions 4-6: ~10% combined
- Positions 7+: <5% (most viewers never scroll there)
If your best content is sitting at position 8, it’s effectively invisible. Reordering is the highest-leverage change you can make to highlight performance — takes 60 seconds, costs nothing, lasts months.
The three-step reorder process
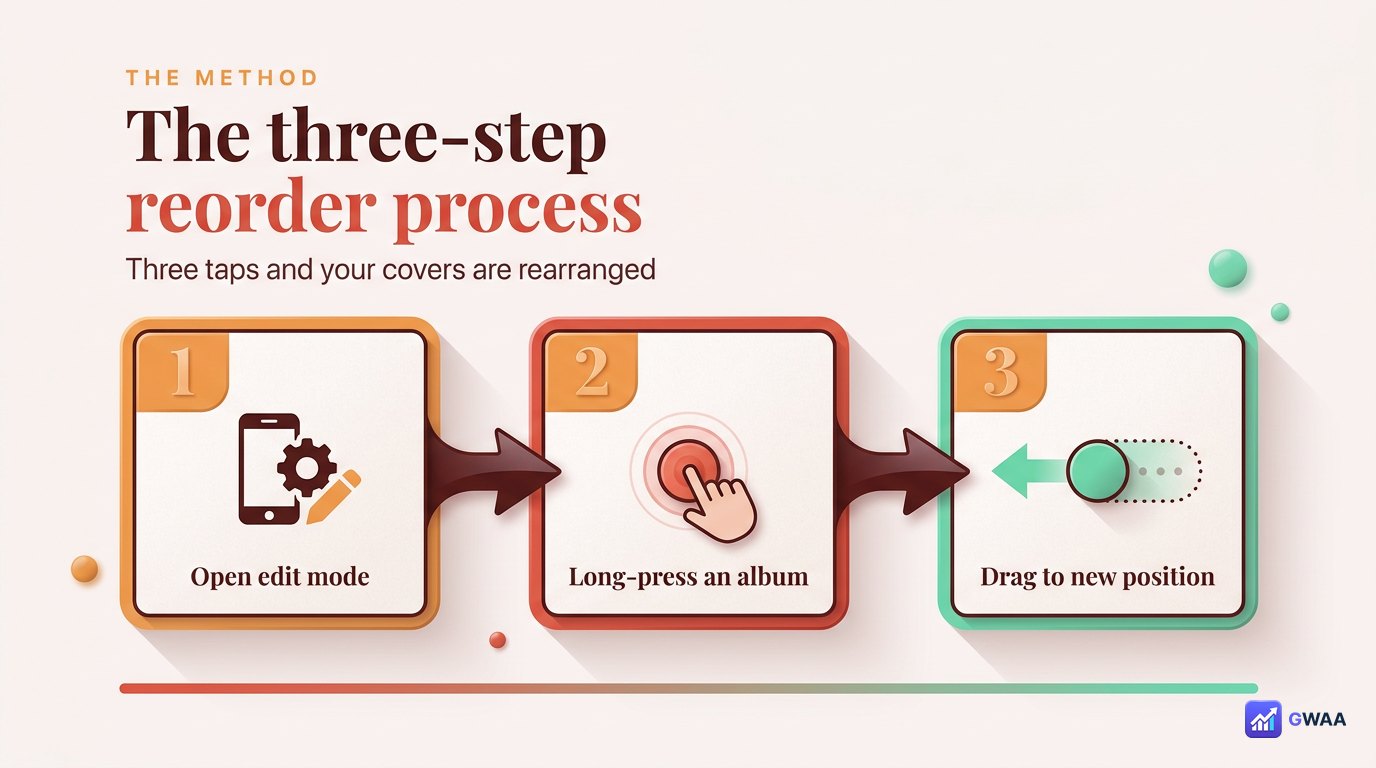
The mechanics are simple but the entry point isn’t obvious:
- Open your profile. Tap any highlight to start viewing it.
- Enter edit mode. While the highlight is playing, tap the three-dot menu → "Edit Highlight." Alternatively, long-press any highlight on the profile and choose Edit from the popup.
- Long-press and drag. In the edit list of all your highlights, press and hold any album. It lifts up, ready to drag. Move it left or right to the new position. Release.
The new order saves instantly. There’s no "Save" button to tap — the drag commit is the save action.
Position 1 = your strongest content
The question to ask: what one highlight do you most want new visitors to see? That goes in position 1. Common answers:
- Creators: testimonials, best work, signature content series.
- Brands: primary product line, current campaign, brand-story album.
- Personal: the album that best represents who you are right now.
- Service businesses: FAQ or "How it works" — the album that answers the question most visitors arrive with.
Whatever it is, position 1 is its home. Move anything else.
Seasonal vs static ordering
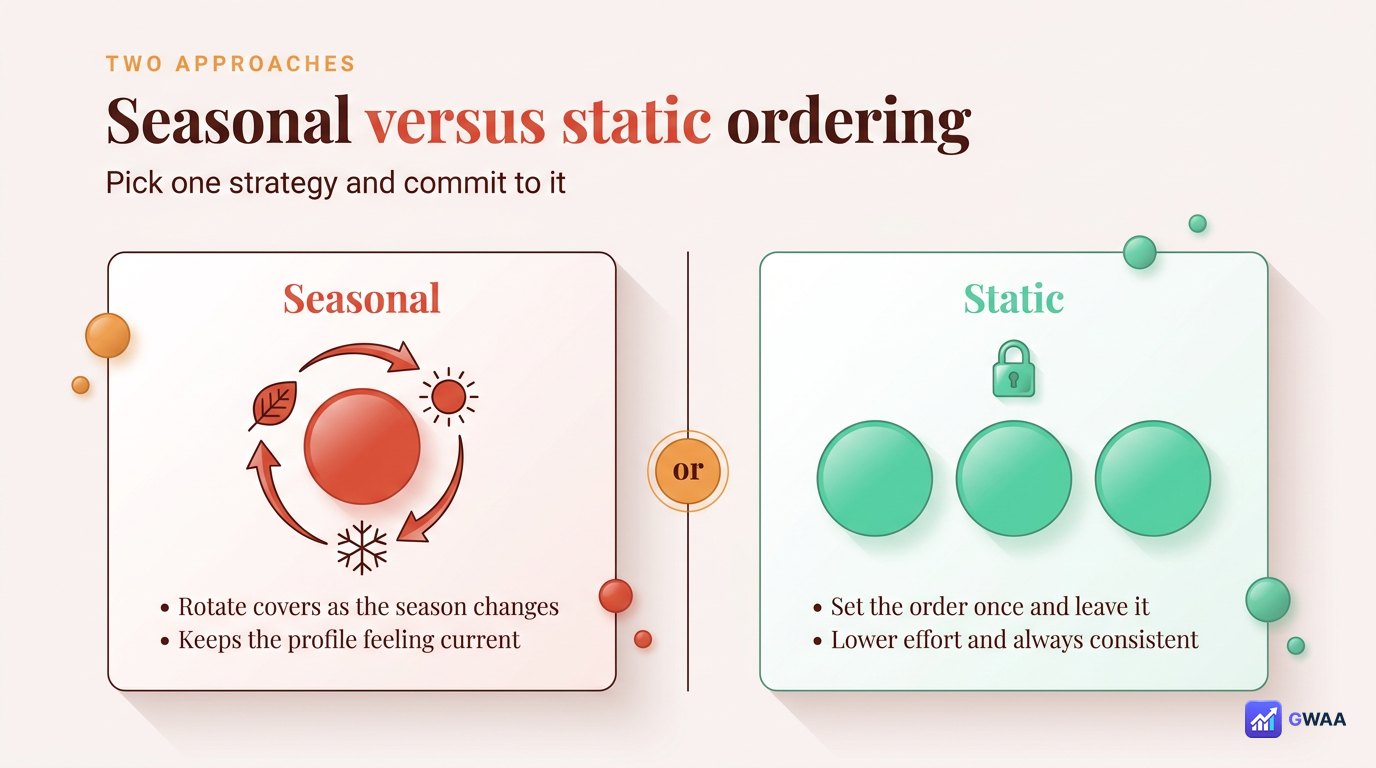
Two valid approaches:
- Static: set the order once, leave it for months. Best for accounts where evergreen content (FAQ, testimonials, products) dominates.
- Seasonal: rotate positions 5-7 seasonally while keeping positions 1-4 static. Best for accounts where current campaigns, seasonal content, or recent launches need visibility.
The wrong approach is half-and-half — rotating randomly when you remember. That breaks visitor mental models. Pick one strategy and stick with it for 6 months before reassessing.
Reorder by purpose, not chronology

The natural temptation is to order chronologically (most recent first). Resist that. Better ordering:
- Position 1: what you most want new visitors to see (usually evergreen "best of" content).
- Position 2: current campaign or promotion (time-sensitive).
- Position 3: FAQ or "how it works" (answers visitor questions).
- Positions 4-6: supporting content (behind-the-scenes, product lines, testimonials by category).
- Position 7+: archive and seasonal content people specifically scroll to find.
This ordering treats highlights as a strategic asset, not a chronological feed.
View counts and stories carry over

A common worry: "Will I lose view counts if I move an album?" No. Reordering preserves:
- The view count on each individual story inside every album.
- The viewer list for each story (who has seen it).
- The cover image on each album.
- The album name.
- Every story inside, in the original order they were added.
The ONLY thing that changes is the album’s position in the horizontal row on your profile. Drag freely — nothing is at risk.
Preview before committing to a new order

After reordering, immediately view your own profile from the front. Three checks:
- Position 1 is your intended strongest album? Glance test — if you can’t tell what your account is about from position 1, rethink.
- Positions 2-3 feel right thematically? They should complement position 1, not compete.
- The row scans cleanly? No abrupt visual breaks in cover style between positions 1-6.
If anything feels off, drag again. The cost of testing is nothing — just your time.
Rename + reorder go together

While you’re in edit mode, take the chance to rename albums too. Same edit screen, same safety guarantee:
- Tap an album to enter individual edit.
- Tap the name field at the top.
- Type new name. Save.
The album stories, view counts, and order position all stay intact. Use this to align album names with your new ordering strategy — if positions 1-3 are now your "signature" content, the names should reflect that.
Three mistakes to avoid

Common pitfalls when reordering:
- Reshuffling every week. Visitors who return notice the changes and find it disorienting. Once a quarter is plenty.
- Putting archive content in slot 1. "Travel 2024" in position 1 signals an inactive account. Current content goes first.
- Breaking category groupings. If you have 3 product-line albums, keep them adjacent to each other. Don’t scatter them across positions 1, 5, and 9.
Naming convention during reorder
Position changes are also a good time to align album names. Three rules that compound with good ordering:
- Short and scannable. If your album labels span different lengths ("FAQ" vs "Frequently Asked Questions"), the row feels uneven. Pick one length norm and use it across all albums.
- Title case or lowercase consistently. "Travel" + "FOOD" + "work" reads chaotic. Pick title-case OR all-lowercase OR all-uppercase and apply uniformly.
- No emoji in labels. Emoji break visual alignment under tiny circular covers. Even if functional, they hurt the row’s composition.
Names show under each cover at small typography size, so consistency reads as professionalism. Tap into edit mode, rename any album whose name breaks your norm, save. 30 seconds of polish.
If you manage multiple accounts
For agency owners, social media managers, or multi-brand operators: a consistent reorder approach across accounts simplifies the workflow.
- Same position-1 logic on every account: always your strongest evergreen content. Saves decision-making.
- Same quarterly rhythm: reorder all accounts on the same calendar week. Batch the work; reduce context-switching cost.
- Same length cap: 6-8 albums per account works as a portfolio-wide standard. Resist account-specific exceptions.
This approach scales. Whether you have 2 accounts or 20, the same playbook applies.
Quarterly reorder rhythm

The cadence sweet spot:
- Q1 (Jan-Mar): often a "fresh start" reorder — put new year initiatives first.
- Q2 (Apr-Jun): spring/summer content promoted up; winter content moved back.
- Q3 (Jul-Sep): summer peak content moved to position 1; back-to-school or seasonal pivots.
- Q4 (Oct-Dec): holiday content + end-of-year highlights take the front positions.
Quarterly is enough to keep things fresh without exhausting your audience with constant change.
Use the reorder session to consolidate too
The same edit screen that lets you reorder also lets you delete or rename albums. When you’re already in that screen quarterly, take 5 extra minutes to:
- Delete sparse albums. Anything under 3 stories that you haven’t updated in 6+ months. The stories stay in your Archive; you just free the highlight slot.
- Rename for clarity. If an album was originally called "Travel 2024" but you’ve added 2026 trips to it, rename to just "Travel" so the name doesn’t feel dated.
- Merge overlapping themes. Two pet albums? Combine them. Two random promo albums? Combine. Less is more once you’re past 8 albums.
The reorder isn’t just about positions — it’s a quarterly health check on your whole highlights row. Treat it as one task.
Mobile vs desktop reorder
Drag-and-drop reordering works on both:
- Mobile (iOS or Android): the primary way most people do it. Touch-and-hold works smoothly; the drag motion feels natural with thumb gestures.
- Desktop browser: works but the drag interaction is less polished. Mouse-press-and-hold then drag. Some browsers handle it slightly better than others.
If you have many albums to reorder, mobile is faster — thumbs are quicker than mice for repeated drag operations. Desktop is fine for occasional one-album moves.
If a reorder goes wrong
If you reorder and immediately regret the new arrangement (e.g., you dragged the wrong album), Instagram doesn’t have an "undo." You have to drag back manually. Two minutes of work, but worth knowing:
- No version history. Instagram doesn’t snapshot your previous order. There’s no rollback button.
- Drag back is the only fix. Re-enter edit mode, drag the album back to its previous position.
- The view counts are still safe. Even with the wrong order temporarily, no data is lost.
Practical: before doing a big reorder session, screenshot your current order. If you mess up halfway, you have a reference to restore from.
Archive at position 7+ instead of deleting
One nuance: an album you don’t want to delete entirely but doesn’t deserve prime real estate can live happily at positions 7+. These are still accessible to anyone who specifically scrolls right, but they don’t clutter the prime row.
Good candidates for position 7+ (the "archive" zone):
- Old seasonal content. "Winter 2024" can live here forever — people who want it can scroll to it.
- Niche personal moments. A specific wedding or event that doesn’t represent your current account but you want to keep.
- Past campaigns. Brand promotions that ended but you want to preserve as portfolio.
Don’t delete these. Just push them to position 7+ and they’re effectively archived in plain sight.
A simple ordering exercise can change perceptions of your account meaningfully — and it costs only a minute of your time, today.
The three-number recap

The whole approach in three numbers:
- 4-6: covers visible without scrolling on the profile
- 90%: share of total attention on those first 4-6
- 3: taps to reorder any album to any position
Highlight ordering is content strategy with a one-minute implementation cost. Most accounts never bother. The ones that do see compounding benefit — better visitor first impressions, higher engagement on featured highlights, easier maintenance over time.
A/B testing position 1 for analytics-equipped accounts
If you have a Creator or Business account with Instagram Insights enabled, you can measure the impact of reordering:
- Note the per-highlight view count for each album before reordering.
- Reorder so a different album lands in position 1.
- Wait two weeks (long enough for the view count to settle into a new trend).
- Compare the new position-1 album’s view rate against its previous rate.
Repeat with different candidates and you build a data-driven picture of which content actually deserves position 1 for your specific audience — not just what you think should be there. Most accounts skip this analytical layer and rely on intuition, which is fine for personal accounts but leaves performance on the table for serious creators and brands. Even one A/B cycle a quarter materially improves your understanding of what works.
Related guides
- How to organize Instagram highlights — the broader six-step curation method.
- How to make highlight covers — the design layer.
- How many highlights can you have — the platform limits.
- Instagram profile analytics explained — measuring whether reordering improves engagement.
- Anonymous viewer playbook — broader tool context.